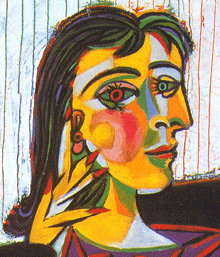
Cycle 3 Week 14- Picasso’s Portraits

Pablo Picasso is one of the forerunners of Cubism, an art movement that began in the early 1900’s. He began painting subjects from multiple viewpoints, giving his work a blocky, fractured look. Words I would use to describe his work are messy, explosive, and even disturbing. Your students will have a lot to talk about when they look at his portraits!

This artist and project may challenge a lot of your students because it is not traditionally “pretty”. So many great discussions can be had from the topic, and unfortunately there’s not enough time to talk through them all in class. Some options to encourage parents to discuss at home are “Does art have to be pretty to be successful?”, “What’s more important: the way art looks, or the message it conveys?”, and “In order to be a true portrait, does the artwork have to look like the person?”.

Continue Reading →

Cycle 3 Week 1- North American Animal Drawings

My family and I took a road trip a few years back, following part of the route that Lewis and Clark took to the Pacific Ocean. We listened to the book Seaman: The Dog Who Explored the West with Lewis and Clark, visited the Lewis and Clark National Historical Park, and relaxed in the beauty of the Oregon coast. I didn’t know much about their journey before this, but was quickly amazed by what they and their companions encountered and experienced.

One thing that stuck with me was the breadth of skill and knowledge that Lewis and Clark needed to lead such a unique mission. They had to know about medicine, botany, astronomy, zoology, geography… and drawing! In journals they described and sketched many animals they saw during the trip. Some animals written about were squirrels (their dog Seaman caught them, and they fried them up for food), pronghorn antelope, prairie dogs (other names they came up with were “ground rat” and “burrowing squirrel”), and the jackrabbit to name a few.

The lessons below focus on drawing North American animals that the explorers would have come across in their travels. Just like Lewis and Clark, our students will practice honing their observation and drawing skills among the many other subject matter they know.

Continue Reading →

Cycle 2 Week 17- Morisot & Impasto

This project is about creating texture through paint.  The Impressionists used a technique called “impasto”, using thick paint on the canvas in such a way that the texture was very apparent and purposeful.  

When I first did this lesson several years ago, I followed the lesson idea from the book Discovering Great Artists closely.  You can still find that video in this post, but I’ve also included a new video that suggests a different method.  I find using this new lesson (using just joint compound to thicken paint) better teaches the Impressionist’s technique and is a more realistic experience for students to discover Morisot’s style.

Below you will find lesson plans as well as downloadable line drawings of some of her paintings.  The students will use the textured paint to fill in these images.  Because the paint is so thick, it is best to do this project in the beginning of the day so it has lots of time to dry.

Continue Reading →

Cycle 2 Week 18- Van Gogh’s Starry Night

I’m super excited that Van Gogh is part of our great artists line up this year. Talk about a famous artist. His work also provides a link in the chain of how we got from realistic artwork to abstraction in the early 1900s, which is a great topic of conversation.

This project walks students through replicating Van Gogh’s famous painting Starry Night. I love that we learned about astronomy this year, and can connect our knowledge about stars and phases of the moon to this painting. Students can even arrange the stars in the painting into their favorite constellation!

Continue Reading →

Welcome back!

The new school year is at my family’s doorstep, and I’m beginning to shift my thoughts from summer vacation back to homeschooling and lesson planning. With the 5th edition Foundations Guide changes, I know that many of you have also been planning ahead and wondering if I will have new lessons focused on the new guide.

As I looked through, I decided that I will not be adding new lessons for weeks 1-6. The drawing lessons for weeks 3-6 still correlate to the guide for that week, so that leaves weeks 1 and 2, which I had connected to the science memory work. The drawing lesson for week 1 focuses on animals and insects, which can now be related to the days of creation. The lesson for week 2 is a bear drawing, and bears can be found in almost every biome, from Giant Pandas in the tropical rainforest, to Polar Bears in the arctic tundra. I feel like its a good fit!

My plan for the next few weeks is to put out a few videos exploring how to prioritize great conversation in our art lessons. And, of course, I’ll update any necessary changes to the great artists lesson plans later in the year, most likely in the beginning of December.

I hope you all enjoy the last few weeks of summer. I sure plan to!

Cycle 1 Week 18- El Greco

Our last great artist for the year is Domenikos Theotokopoulos. Try saying that five times fast! It’s no wonder people just called him “The Greek”. Or maybe it’s because he lived and worked in Spain, but was born in Greece. Hmm.

El Greco (“The Greek”) is known for his elongated, slender figures. He was more focused on the emotional and imaginative aspect of his paintings than on capturing reality, and I think the beginnings of abstraction can be seen there. Students will create a portrait similar to his style by elongating a basic figure, then adding their own features and color to the work.

For additional images that would work well for masters classes, check out Half a Hundred Acre Wood. At the bottom of the page you’ll find templates for the Mona Lisa and El Greco Son. The same process applies as in the video below, just with more complicated subject matter.

Continue Reading →

Cycle 1 Week 17- Michelangelo

When I think of Michelangelo painting the Sistine Chapel ceiling, I picture him lying on his back atop huge scaffolds, working in this position for years and years.  I’m not sure if I was formerly taught this, but come to find out, it’s a widespread misconception!  He did work atop tall scaffolds, but stood upright with his head craned back to paint.  Not surprisingly, that dude was fed up with the Sistine Chapel ceiling by the time he was done.  

The Michelangelo project in Discovering Great Artists, p. 25, still goes off the assumption that Michelangelo laid on his back to paint the ceiling.  The directions in my lesson plan mimic this, as it is much easier to tape paper under a table than to erect scaffolding to reach the ceiling, but if you find a solution that allows students to stand and paint above their heads, please share!  

Continue Reading →

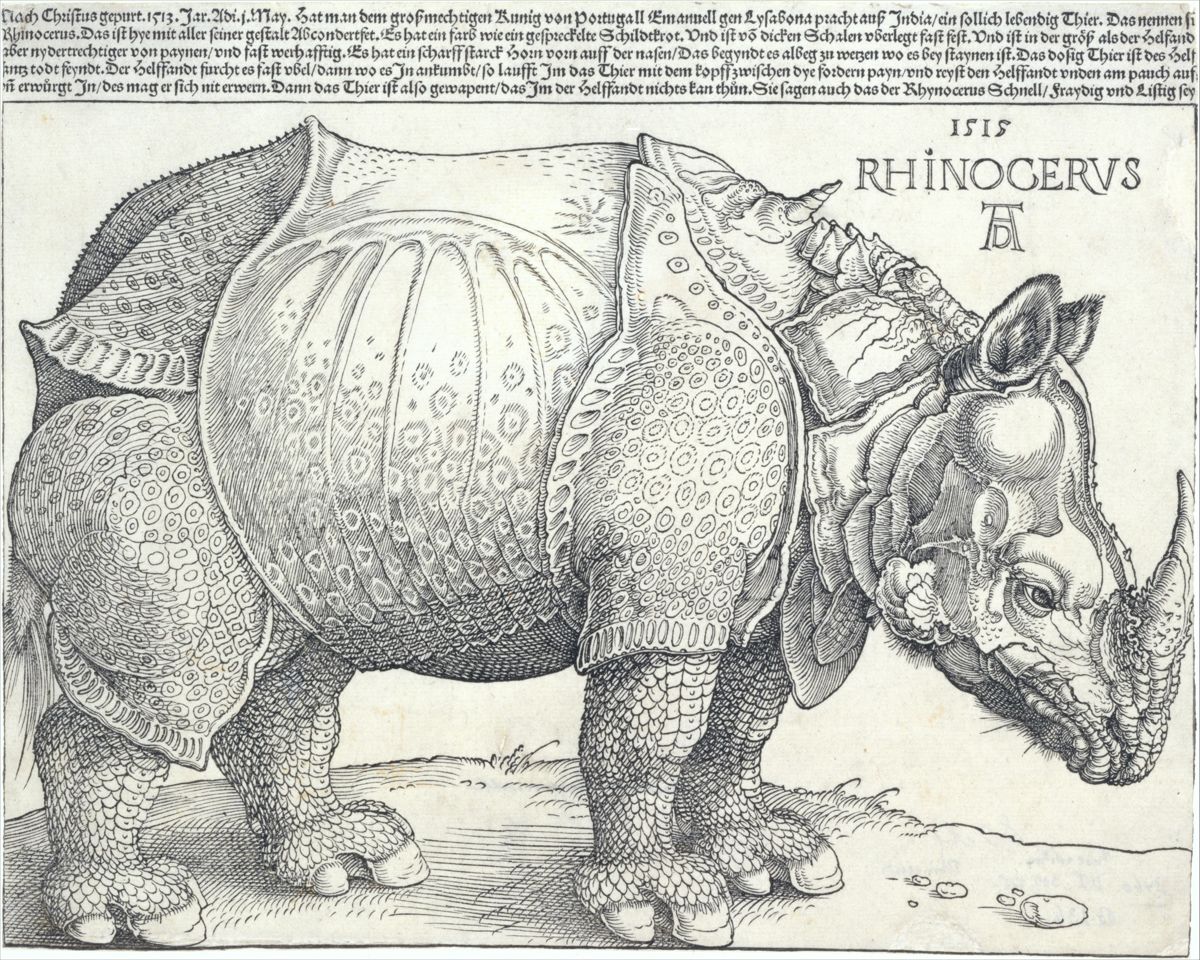
Cycle 1 Week 16- Durer

Durer created beautiful masterpieces in all sorts of media, from oil paint to watercolor, and etchings to woodblock prints.  His prints were beyond compare, especially for the time period, and still wow us today.  One of his most famous woodblock prints is Rhinoceros, and so this lesson plan focuses on animal subject matter for creating our own prints.  Durer also did wonderful watercolors of animals, full of texture and detail, which we can also use to inspire our students. 

Continue Reading →

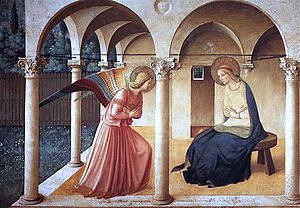
Cycle 1 Week 15- Angelico

Fra Angelico is well-known for his altarpieces and frescoes, his most notable being The Annunciation painted in the Convent of San Marco in Florence, Italy.  He painted several paintings on this same theme throughout his life, but this is by far his most well-known work.  To help students get a firm grasp on his subject matter, we will be replicating another of his images of the Annunciation, but one that is much simpler.  The Annunciatory Angel  also depicts Gabriel announcing to Mary that she will be the mother of the Christ and shows the golden halo typical of the time. Continue Reading →

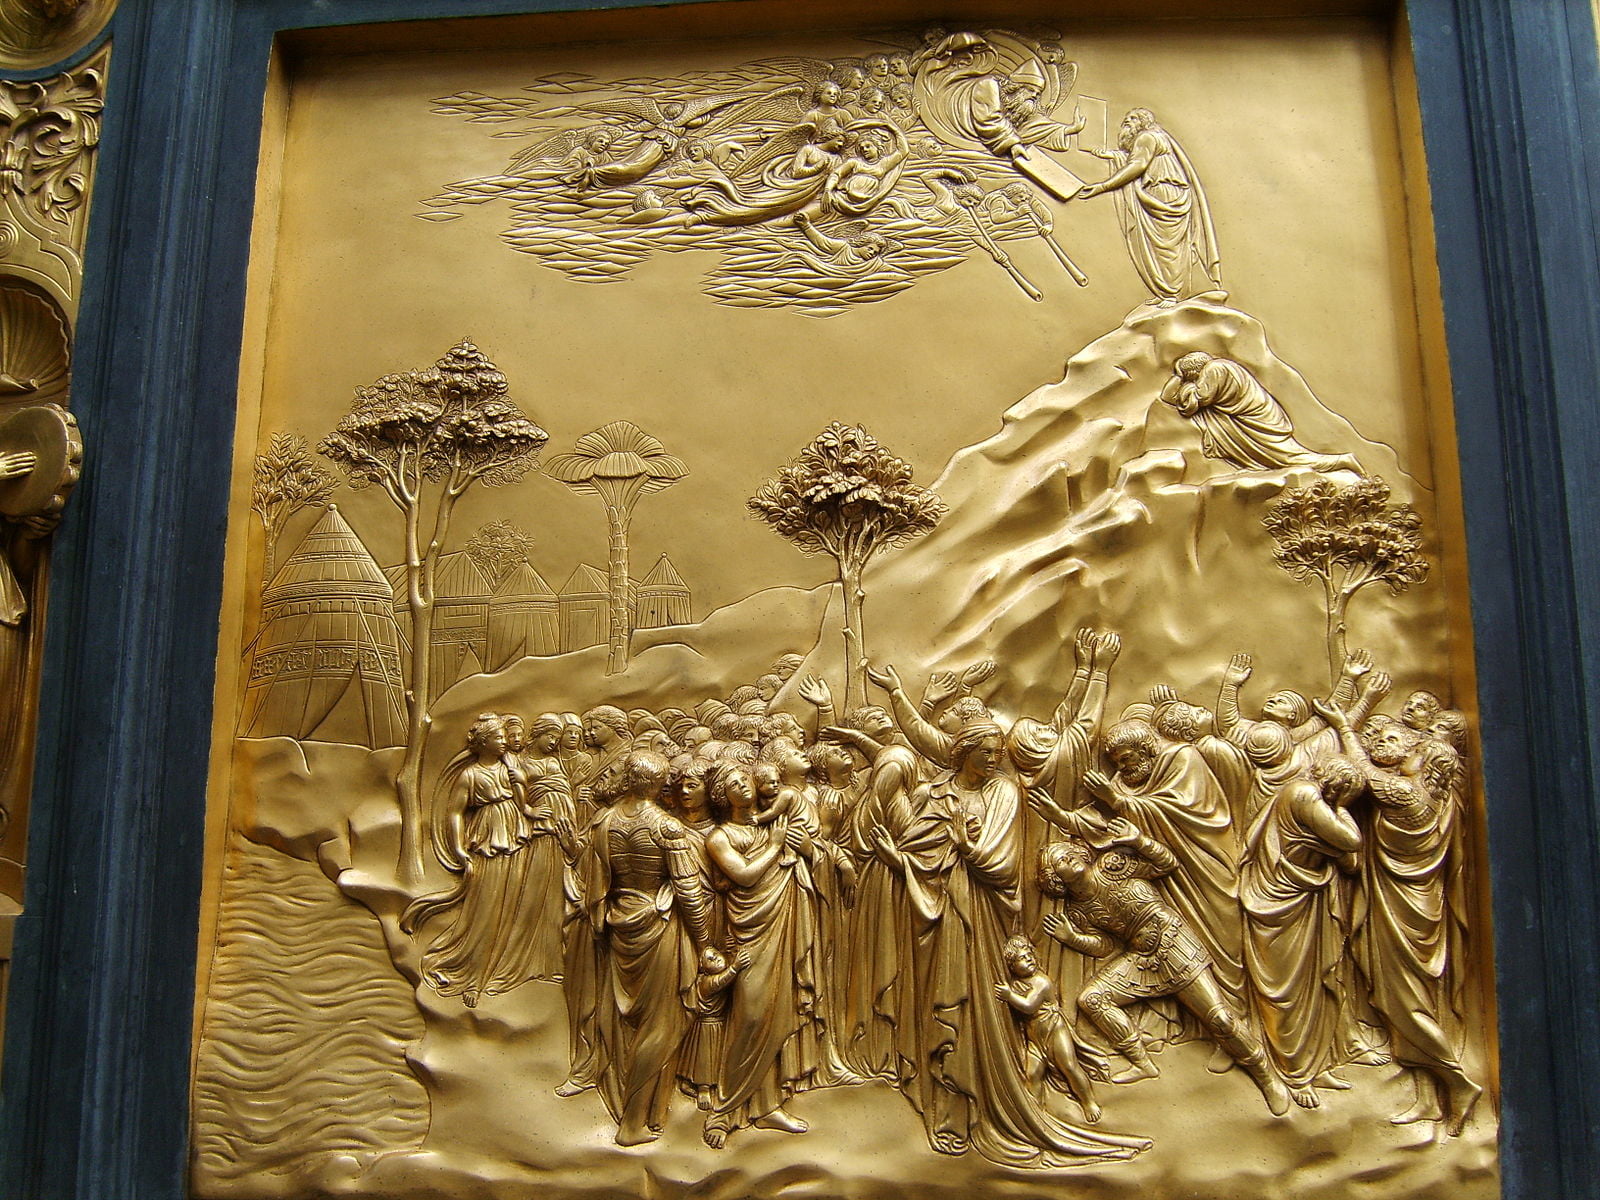
Cycle 1 Week 14- Ghiberti

Ghiberti’s masterpiece, dubbed the “Gates of Paradise”, are beautiful relief panels adorning the doors of the Baptistry of San Giovanni in Florence.  It took over twenty years for Ghiberti to complete this project!  He first carved wax molds, then cast them in bronze, and then polished, sanded, and incised details.  Finally, he covered them with a layer of gold.  Twenty years on the same project takes a lot of dedication!

Our twenty-first century replica is to use wax wikki stix, dull pencils, and aluminum foil to create the same thing in half an hour.  Well, maybe not the same thing, but you get the idea. Continue Reading →

Post Navigation